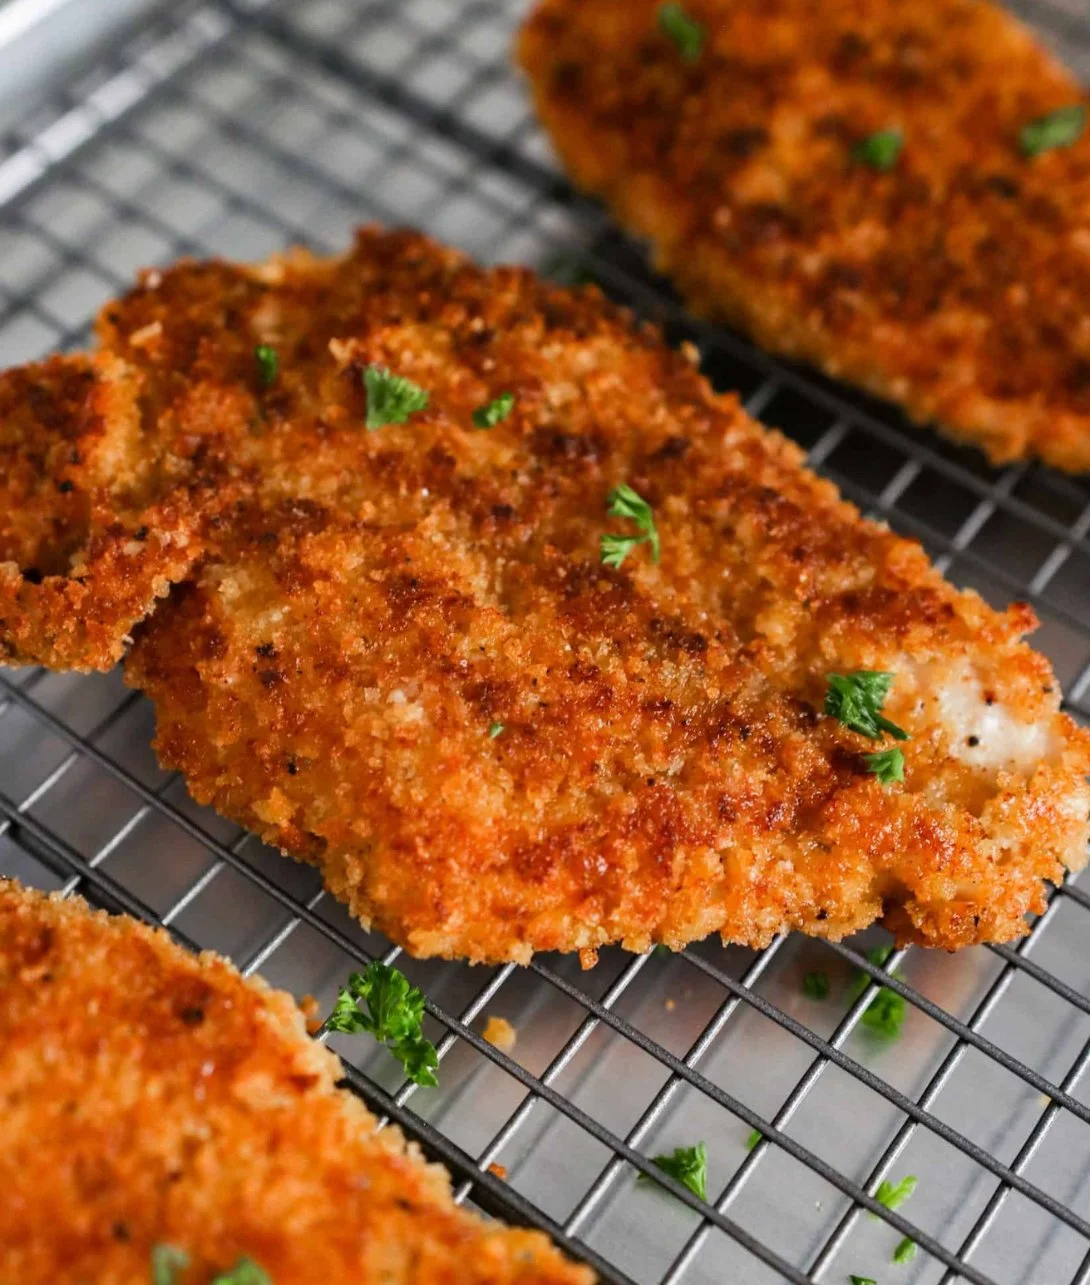
There’s something so satisfying about a perfectly cooked piece of chicken, especially when it’s enveloped in a crunchy, golden crust. The kind of crust that crumbles delightfully with every bite, releasing succulent, juicy chicken that dances with flavor. This Crispy Panko Crusted Chicken Breasts recipe is not just about feeding your belly; it’s a culinary experience that brings joy to the table. Imagine sitting down for a meal where everyone is excited, forks at the ready, as you plate up this crispy delight.
## Recipe Timing
- Prep Duration: 15 minutes
- Active Cooking: 25 minutes
- Total Duration: 40 minutes
- Portion Size: Serves 4
- Complexity: Simple
## Nutritional Recipe
- Calories per portion: 320
- Protein: 27g
- Carbs: 28g
- Fats: 12g
- Fiber: 1g
- Sugars: 1g
- Sodium: 480mg
## Why You’ll Love This Crispy Panko Crusted Chicken Breasts
This recipe is a treasure trove of crunchy goodness that makes weeknight dinners feel special. The use of panko breadcrumbs elevates it beyond the ordinary, creating a texture that’s both satisfying and addictive. It’s simple and quick, perfect for those busy evenings when you want to serve your family something delicious without a fuss. Whether you’re serving it with a side of veggies or slipping it into a sandwich, this chicken could very well become your new go-to dish.
## The Complete Cooking Journey
Let’s embark on this flavorful journey! With just a handful of ingredients and simple steps, you’ll soon have an incredible meal on your table. Trust me, once you take that first bite, you’ll be hooked on the perfect combination of crunch, flavor, and juicy chicken.
## Ingredients:
- 4 chicken breasts
- 1 cup panko breadcrumbs
- 1/2 cup all-purpose flour
- 2 large eggs
- 1 teaspoon salt
- 1/2 teaspoon black pepper
- 1/2 teaspoon garlic powder
- 1/2 teaspoon onion powder
- Olive oil or cooking spray
## Method:
### Step 1: Preheat the Oven
Preheat your oven to 400°F (200°C). This sizzling start will ensure your chicken cooks beautifully while achieving that lovely crispy crust.
### Step 2: Set Up Your Breading Station
Prepare your breading station by placing the seasoned flour (with salt, pepper, garlic powder, and onion powder) in one bowl, beating the eggs in another, and filling a third bowl with panko breadcrumbs. This station is key to achieving the perfect breading!
### Step 3: Dredge the Chicken
Take each chicken breast and dredge it in the flour, shaking off any excess. Then dip it into the beaten eggs, letting the extra liquid drip off. Finally, coat it with the panko breadcrumbs, pressing gently to get the breadcrumbs to adhere. This meticulous process is what will give your chicken that irresistible crunch.
### Step 4: Prepare for Baking
Place your breaded chicken breasts on a baking sheet lined with parchment paper. This not only helps with easy cleanup but also prevents sticking. Lightly spray or drizzle them with olive oil to encourage browning during baking.
### Step 5: Bake to Perfection
Pop the baking sheet in the preheated oven and bake for 20-25 minutes, until the chicken is cooked through (the internal temperature should reach 165°F/74°C) and the crust is a lovely golden brown. The aroma wafting through your kitchen will be hard to resist!
### Step 6: Serve Hot and Enjoy!
Once done, take the chicken out and let it rest for a minute before serving. Slice it up, plate it, and prepare for accolades from your friends and family.
## Serving Suggestions & Pairings
This crispy chicken is so versatile! Serve it with a fresh garden salad, roasted vegetables, or alongside creamy mashed potatoes for a comforting meal. For something lighter, pair it with a zesty lemon aioli or tangy dipping sauce. Consider adding some fluffy rice or a crispy coleslaw for a crunchy contrast.
## Storage & Leftovers Guide
Leftover chicken can be stored in an airtight container in the fridge for up to 3 days. You can also freeze it (if frozen promptly) for up to 3 months. To reheat, pop it back in the oven at 350°F (175°C) for about 10-15 minutes to maintain that delicious crunch.
## Kitchen Wisdom & Success Tips
- Make sure your chicken breasts are of even thickness for consistent cooking – pound them to an even thickness if needed.
- If you prefer, you can add some grated parmesan to the panko for an extra flavor boost.
- If you want to spice things up, consider adding cayenne pepper or paprika to your flour mix for a bit of heat.
- For even more texture, you can add crushed nuts to the panko breadcrumbs.
## Flavor Variations & Adaptations
Feel free to get creative! Try flavored panko (like herb or spicy) for a unique twist. You can even replace chicken breasts with eggplant, zucchini, or tofu for a delightful vegetarian option. Just adjust the cooking time as needed.
## Reader Questions & Solutions
-
Can I use regular bread crumbs instead of panko?
Yes, but the texture won’t be quite as crispy. Panko is lighter and results in a better crunch. -
What if my chicken isn’t cooking through?
Ensure your oven is properly preheated and that your chicken is of even thickness. Adjusting baking time may be necessary! -
Can I air fry these instead?
Absolutely! Preheat your air fryer to 390°F (200°C) and cook for about 12-15 minutes, flipping halfway through for extra crispiness. -
How can I make it gluten-free?
Substitute all-purpose flour with a gluten-free flour blend and use gluten-free panko. -
Can I marinate the chicken beforehand?
Sure! A marinade of yogurt or buttermilk can add flavor and moisture; just be sure to pat dry before breading.
## Wrapping Up
Cooking is a delightful journey, and this Crispy Panko Crusted Chicken Breasts recipe is a fantastic way to celebrate that journey. It’s simple yet stunning, making it perfect for both weeknight dinners and special occasions. With each crunchy bite, you’ll feel proud of what you’ve made and inspired to share it with others. So gather your loved ones, embrace the joy of cooking, and enjoy every crispy, tender morsel of this dish. Happy cooking!
Print
Crispy Panko Crusted Chicken Breasts
- Total Time: 40 minutes
- Yield: 4 servings 1x
- Diet: None
Description
Enjoy perfectly cooked chicken breasts with a crunchy panko crust that is juicy and flavorful.
Ingredients
- 4 chicken breasts
- 1 cup panko breadcrumbs
- 1/2 cup all-purpose flour
- 2 large eggs
- 1 teaspoon salt
- 1/2 teaspoon black pepper
- 1/2 teaspoon garlic powder
- 1/2 teaspoon onion powder
- Olive oil or cooking spray
Instructions
- Preheat your oven to 400°F (200°C).
- Prepare your breading station by placing the seasoned flour in one bowl, beating the eggs in another, and filling a third bowl with panko breadcrumbs.
- Dredge each chicken breast in the flour, dip into the beaten eggs, then coat with panko breadcrumbs.
- Place the breaded chicken breasts on a baking sheet lined with parchment paper and spray or drizzle them with olive oil.
- Pop the baking sheet in the oven and bake for 20-25 minutes until cooked through and golden brown.
- Serve hot, let it rest before slicing and enjoying!
Notes
For extra flavor, consider adding grated parmesan to the panko or using herb-flavored panko. Adjust cooking times for different proteins.
- Prep Time: 15 minutes
- Cook Time: 25 minutes
- Category: Main Course
- Method: Baking
- Cuisine: American
Nutrition
- Serving Size: 1 serving
- Calories: 320
- Sugar: 1g
- Sodium: 480mg
- Fat: 12g
- Saturated Fat: 3g
- Unsaturated Fat: 6g
- Trans Fat: 0g
- Carbohydrates: 28g
- Fiber: 1g
- Protein: 27g
- Cholesterol: 70mg