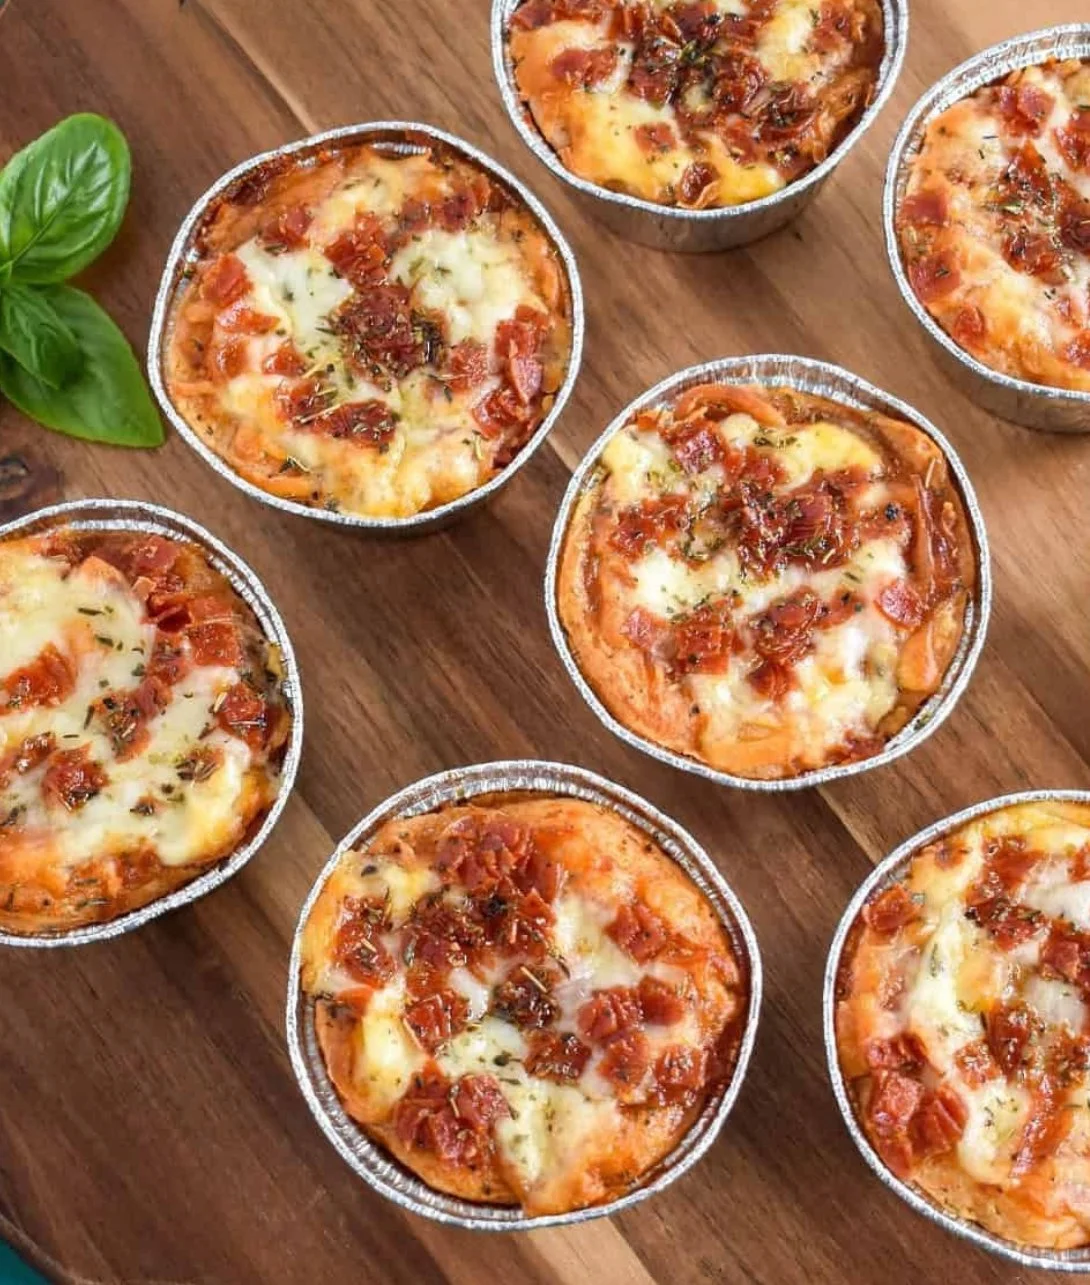
When I was a child, our kitchen was the heart of the home. With the aroma of freshly baked bread and simmering pasta filling the air, it was in this space I fell in love with cooking. One warm evening, my mom and I decided to reinvent our beloved pizza for a family gathering. Instead of our usual round pies, we created tiny, individual pot pies filled with all the gooey goodness we love about pizza. The delight on everyone’s faces that night? Absolutely priceless. Fast forward to today, and I’m here to bring that nostalgia back for you with these delightful Pizza Pot Pies. They’re like a hug in pastry form—warm, comforting, and perfect for sharing (or keeping all to yourself!).
Recipe Timing
- Prep Duration: 15 minutes
- Active Cooking: 25 minutes
- Total Duration: 40 minutes
- Portion Size: Serves 4
- Complexity: Simple
Nutritional Recipe
- Calories per portion: Approximately 350 calories
- Protein: 15 grams
- Carbs: 30 grams
- Fats: 20 grams
- Fiber: 1 gram
- Sugars: 3 grams
- Sodium: 600 mg
Why You’ll Love This Pizza Pot Pies
These Pizza Pot Pies are not only irresistibly delicious, but they also make for a fun and interactive dining experience. Perfect for family movie nights, they allow everyone to indulge in their favorite toppings—without any of the mess! Plus, they’re easily customizable, so whether you prefer pepperoni, veggies, or a combination of both, these pot pies are entirely yours to design. The golden crust envelops a melty, savory filling, making every bite a delightful surprise.
The Complete Cooking Journey
Let’s embark on this delicious journey together! From the quick preparation to the bubbling goodness waiting in your oven, every step will bring you closer to your new favorite comfort food.
Ingredients:
- 1 package refrigerated pie crusts
- 1 cup pizza sauce
- 1 1/2 cups shredded mozzarella cheese
- 1 cup diced pepperoni or your choice of toppings
- 1/2 cup sliced bell peppers
- 1/4 cup sliced black olives
- 1/2 teaspoon dried oregano
- 1/2 teaspoon garlic powder
- 1 egg (for egg wash)
Method:
Step 1: Preheat the Oven
Preheat the oven to 425°F (220°C) to prepare for baking those lovely pot pies!
Step 2: Roll Out the Pie Crusts
Roll out the pie crusts and cut them into circles that fit your ramekins or baking dishes. This will create the perfect crust to encase your hearty pizza filling.
Step 3: Place the Crusts
Gently place one circle of pie crust in each pot or ramekin, ensuring that they fit well and create a lovely bottom layer.
Step 4: Mix It Up
In a mixing bowl, combine the pizza sauce, mozzarella cheese, diced pepperoni, sliced bell peppers, black olives, dried oregano, and garlic powder. Give it a good stir to blend all those flavors together.
Step 5: Fill the Crusts
Spoon the delicious pizza mixture into each pie crust. Pack it down a little, but not too tightly; you want those flavors to meld, not get squished!
Step 6: Cover with Top Crust
Cover the filled pies with another round of pie crust. Seal the edges carefully to keep the goodness inside, using your fingers to crimp or press the dough together.
Step 7: Brush with Egg Wash
Brush the tops with beaten egg to achieve that beautiful golden color once baked!
Step 8: Prepare for Baking
Cut slits in the top of each pie to allow steam to escape. This will help them bake evenly and prevent any unexpected eruptions!
Step 9: Bake to Perfection
Bake for 20-25 minutes or until they’re golden brown and bubbling with cheesy goodness. Your kitchen is about to smell amazing!
Step 10: Cool Before Serving
Allow the pot pies to cool slightly before serving—this gives you a moment to relish the anticipation and prevents anyone from burning their tongue!
Serving Suggestions & Pairings
Serve these delicious Pizza Pot Pies with a light side salad to balance the indulgence, or try pairing them with marinara sauce for extra dipping fun! A chilled glass of sparkling lemonade or your favorite soda makes for the perfect drink.
Storage & Leftovers Guide
If you have any leftovers (which is rare with these crowd-pleasers), let them cool completely and store them in an airtight container in the fridge for up to 3 days. They can be reheated in the oven for the taste of freshly baked goodness all over again!
Kitchen Wisdom & Success Tips
- Ensure your crusts are thawed properly; a cold crust can crack and lose its texture.
- Experiment with toppings! Consider adding cooked sausage, mushrooms, or even spinach for a healthier twist.
- If you want a crunchier crust, bake them for an additional five minutes, checking frequently to avoid over-browning.
Flavor Variations & Adaptations
Don’t hesitate to personalize! Replace pepperoni with veggies for a vegetarian version, or swap mozzarella for cheddar for a different flavor profile. You could even make them mini by using muffin tins.
Reader Questions & Solutions
- Can I use homemade pie crust? Absolutely! Homemade crust will make these even more special. Just roll it out to the same thickness as store-bought.
- What if I don’t have ramekins? No worries! You can use any oven-safe dish or even a muffin tin for mini pot pies!
- Can I freeze the pot pies? Yes! Assemble without baking, cover well, and freeze for up to a month. Bake directly from the freezer, adding a few extra minutes.
- How do I prevent the crust from getting soggy? Prebake your bottom crust for 5 minutes before adding the filling to create a barrier that keeps your crust crisp.
- What are good topping ideas? Feel free to get creative! Try jalapeños, artichokes, or any leftover meats or vegetables you have on hand.
Wrapping Up
These Pizza Pot Pies are sure to bring joy and warmth to your kitchen just as they did for my family and me all those years ago. Whether you’re making these for a cozy family dinner or for a fun gathering with friends, they’re bound to impress. Get ready to pull them out of the oven, savor the aroma, and enjoy every cheesy, crispy bite. Happy cooking, and let your creativity shine in the kitchen!