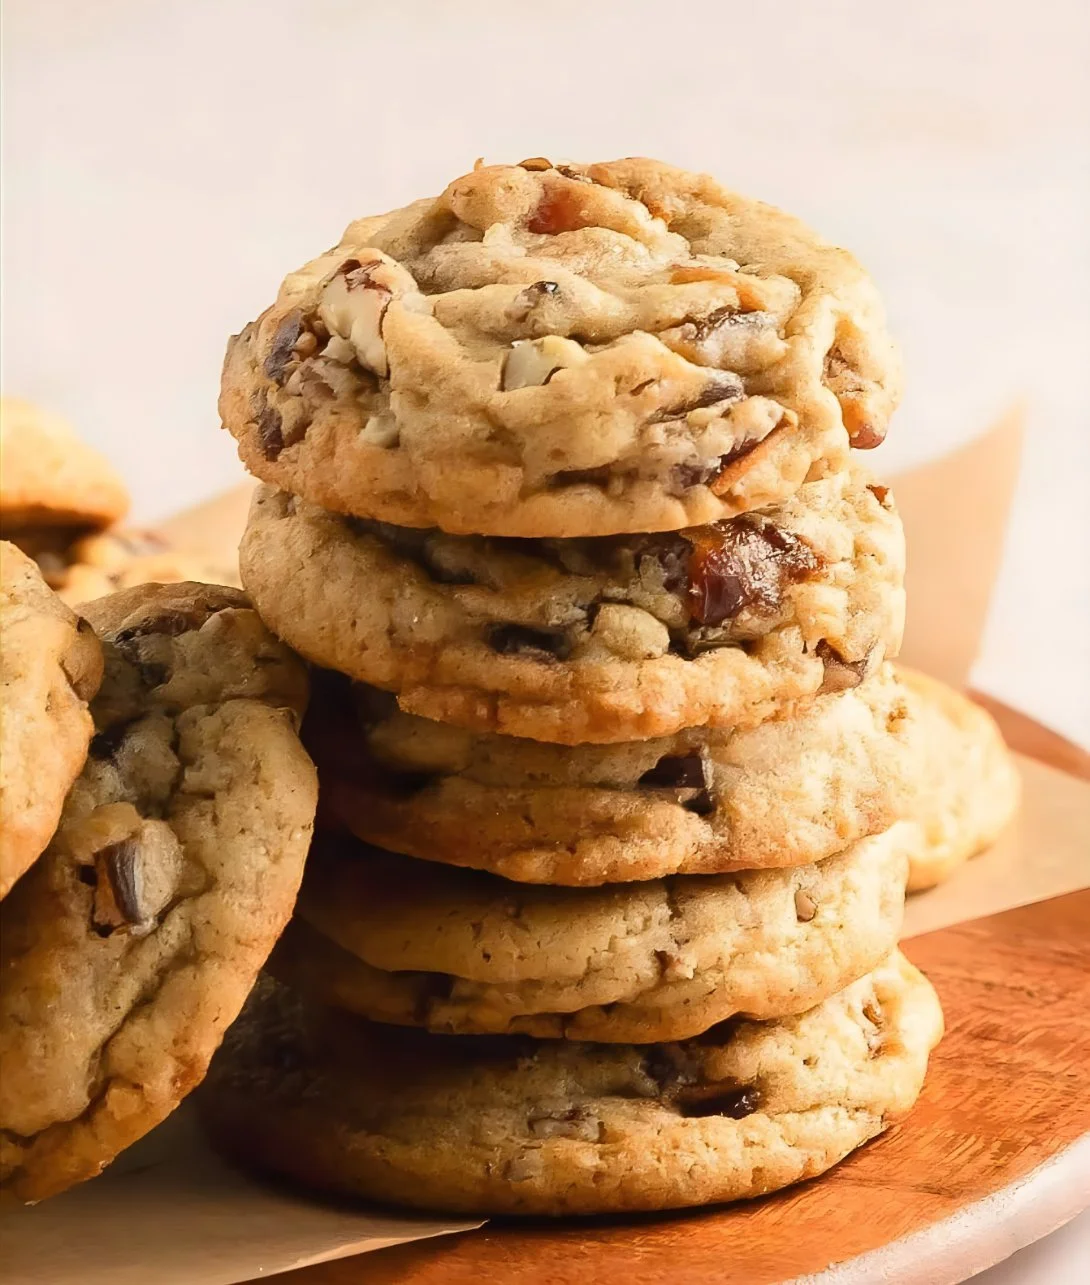
There’s a special joy that comes from sharing homemade treats, don’t you think? For me, nothing beats the nostalgia that wafts through the air when my grandmother’s legendary Date Cookies are baking in the oven. As a child, I would eagerly await the moment the warm, sweet aroma of butter and brown sugar would fill our home, intermingled with that distinct fragrance of sun-dried dates. Each bite was a delightful burst of sweetness, buoyed by the comforting richness of butter and a hint of vanilla. That memory is why today, I can’t resist sharing this simple yet delicious recipe for Date Cookies – a timeless classic that brings warmth and wonderful flavors, making it perfect for any occasion.
Recipe Timing
- Prep Duration: 15 minutes
- Active Cooking: 12 minutes
- Total Duration: 27 minutes
- Portion Size: 24 cookies
- Complexity: Simple
Nutritional Recipe
- Calories per portion: Approximately 95 calories
- Protein: 1.2 grams
- Carbs: 12 grams
- Fats: 4.3 grams
- Fiber: 0.8 grams
- Sugars: 5.3 grams
- Sodium: 75 mg
Why You’ll Love These Date Cookies
These cookies are not just easy to make; they evoke a landscape of rich flavors and comforting textures that dance on your palate. The chewy texture of the chopped dates contrasts beautifully with the buttery softness of the cookie. Plus, they maintain a perfect balance of sweetness, making them irresistibly moreish. Whether you’re looking for a snack to pair with your afternoon tea or a sweet treat to impress your guests, these Date Cookies are sure to become a beloved staple in your home, just like they are in mine.
The Complete Cooking Journey
Let’s embark on this delicious journey! From creaming the butter to that satisfying moment when you pull those golden cookies out of the oven, every step is filled with anticipation. Don’t worry if you’ve never baked before — I’ll walk you through this process with ease, ensuring you create delicious cookies that will have everyone asking for the secret.
Ingredients:
- 1 cup chopped dates
- 1/2 cup sugar
- 1/2 cup butter
- 1 egg
- 1 teaspoon vanilla extract
- 1 1/2 cups all-purpose flour
- 1/2 teaspoon baking soda
- 1/2 teaspoon salt
- 1/2 cup chopped nuts (optional)
Method:
Step 1: Preheat the Oven
Preheat the oven to 350°F (175°C). Setting the right temperature is crucial for that perfect bake!
Step 2: Cream Together Butter and Sugar
In a mixing bowl, cream together the butter and sugar until the mixture is light and fluffy. This step adds air into your cookies, giving them a lovely texture.
Step 3: Add Egg and Vanilla
Beat in the egg and vanilla extract until fully combined, introducing further richness and a delightful aroma into the mix.
Step 4: Combine Dry Ingredients
In another bowl, combine the flour, baking soda, and salt. Whisk these together to ensure even distribution of the baking soda and salt.
Step 5: Mix Dry and Wet Ingredients
Gradually add the flour mixture to the creamed butter and sugar until well combined. The dough should come together beautifully, resembling a thick batter.
Step 6: Fold in Dates and Nuts
Gently fold in the chopped dates and nuts (if using) to the dough. This is where the magic happens as you see those sweet morsels and crunchy bites tumbling into your mixture.
Step 7: Form Dough Balls
Drop spoonfuls of the dough onto a baking sheet lined with parchment paper, ensuring they have space to spread during baking.
Step 8: Bake to Perfection
Bake for 10-12 minutes or until golden brown. The smell wafting from the oven at this stage is simply divine – hang tight!
Step 9: Cool Before Serving
Allow the cookies to cool on the baking sheet for a few minutes before transferring them to a wire rack to cool completely. Patience pays off!
Serving Suggestions & Pairings
These Date Cookies shine when served warm and slightly rustic. Pair them with a cup of freshly brewed tea or coffee for a delightful afternoon treat. They also make for an excellent addition to a dessert platter — imagine their chewy goodness next to chocolate chip cookies, oatmeal raisin, or even a cake!
Storage & Leftovers Guide
To keep your Date Cookies fresh, store them in an airtight container at room temperature for up to a week. If you want to keep them longer, consider freezing them. Place parchment paper between layers and store in a freezer-safe bag for up to three months. Just pop them into the oven for a minute or two to refresh them when you’re ready to enjoy!
Kitchen Wisdom & Success Tips
- Chop Dates Easily: If you find chopped dates sticky and tough to handle, dust the knife with a little flour or use kitchen scissors to snip them easily.
- Room Temperature Ingredients: Ensure your butter is at room temperature for a better mix; it incorporates air more efficiently, yielding a lighter cookie.
- Taste Test: Don’t hesitate to sample the dough at Steps 3 and 6 (before adding the egg) — it’s delicious, but make sure to save some for baking!
Flavor Variations & Adaptations
- Spices: Add a teaspoon of cinnamon or nutmeg to the flour mixture for a warm, spiced twist.
- Chocolate: As a fun twist, add chocolate chips instead of or in addition to the chopped nuts. The melting chocolate mixed with dates is divine!
- Coconut: For a tropical flair, incorporate shredded coconut into the mix. The chewiness pairs beautifully with the dates.
Reader Questions & Solutions
-
Why are my cookies flat?
Flat cookies often result from melted butter or not enough flour. Make sure your butter is softened but not melted, and recheck your measurements. -
Can I substitute the sugar?
Yes! Brown sugar can add even more flavor due to its molasses content. You can also try coconut sugar for a healthier alternative. -
What if I don’t have dates?
If you’re out of dates, chopped dried figs or apricots could serve as a good stand-in, just keep in mind the flavor will change slightly. -
How do I know when the cookies are done baking?
Look for a golden-brown edge. They may seem slightly soft in the center but will firm up once cooled. -
Can I make these cookies gluten-free?
Absolutely! Substitute the all-purpose flour with a gluten-free blend, ensuring it contains xanthan gum for structure.
Wrapping Up
Baking these Date Cookies is more than just a recipe; it’s a chance to bake memories and share love through food. I hope this special treat makes its way into your heart and home as it has in mine. With each batch, remember that your kitchen is a place of joy, discovery, and countless delicious moments. So gather your ingredients, start baking, and enjoy the delightful taste of your homemade Date Cookies — a simple treat that carries the weight of cherished memories. Happy baking!
Print
Grandmother’s Legendary Date Cookies
- Total Time: 27 minutes
- Yield: 24 cookies 1x
- Diet: Vegetarian
Description
Deliciously sweet and chewy date cookies that evoke warm memories and flavors, perfect for any occasion.
Ingredients
- 1 cup chopped dates
- 1/2 cup sugar
- 1/2 cup butter
- 1 egg
- 1 teaspoon vanilla extract
- 1 1/2 cups all-purpose flour
- 1/2 teaspoon baking soda
- 1/2 teaspoon salt
- 1/2 cup chopped nuts (optional)
Instructions
- Preheat the oven to 350°F (175°C).
- Cream together butter and sugar until light and fluffy.
- Beat in the egg and vanilla extract until fully combined.
- In another bowl, combine the flour, baking soda, and salt. Whisk together.
- Gradually add the flour mixture to the creamed butter and sugar until well combined.
- Gently fold in the chopped dates and nuts (if using).
- Drop spoonfuls of the dough onto a baking sheet lined with parchment paper.
- Bake for 10-12 minutes or until golden brown.
- Allow cookies to cool on the baking sheet for a few minutes before transferring them to a wire rack.
Notes
Chop dates with a little flour dust for ease. Room temperature butter helps for better mixing.
- Prep Time: 15 minutes
- Cook Time: 12 minutes
- Category: Dessert
- Method: Baking
- Cuisine: American
Nutrition
- Serving Size: 1 cookie
- Calories: 95
- Sugar: 5.3g
- Sodium: 75mg
- Fat: 4.3g
- Saturated Fat: 2.5g
- Unsaturated Fat: 1.8g
- Trans Fat: 0g
- Carbohydrates: 12g
- Fiber: 0.8g
- Protein: 1.2g
- Cholesterol: 30mg